Monday, November 23, 2015

Oracle Converting To Text in R12

Converting Oracle EBS R12 RDF to REX 

Command: 

           rwconverter.sh stype=rdffile source=ARXINVAD.rdf dtype=rexfile dest=ARXINVAD.rex batch=yes

Benefits
            You don’t need to install Reports designer to read RDF code. You can grep the rex file to check code or you can also open the rex file in any text editor to read the code.


Converting Oracle EBS R12 FMB  to TXT

Command: 

  frmcmp_batch module=APXINWKB.fmb userid=apps/apps  Script=YES Forms_Doc=YES module_type=FORM

Benefits

          You don’t need to install Forms designer to read FMB code. You can grep the txt file to check code or you can also open the txt file in any text editor to read the code. Another advantage is you don’t need to copy all the plls to your desktop to open the fmb.


Converting Oracle EBS R12 PLL  to PLD

Command: 

 frmcmp_batch module=ARXRWAPP.pll userid=apps/apps  Script=YES module_type=LIBRARY Output_File=ARXRWAPP.pld
Benefits

          You don’t need to install Forms designer to read PLL code.You can grep the pld file to check code or you can also open the txt file in any text editor to read the code. Another advantage is you don’t need to copy all the plls to your desktop to open the pll.

Monday, June 15, 2015

Academic v/s Practical Engineering

In a statement to the U.S. Congress in 1953, early on in the development of nuclear reactors, Rickover addressed the confusion amongst the nation's decision-makers in his typical head-on fashion, and notably pointed out the chasm between the world of academia and the world of practical engineering:

“An academic reactor or reactor plant almost always has the following basic characteristics: (1) It is simple. (2) It is small. (3) It is cheap. (4) It is light. (5) It can be built very quickly. (6) It is very flexible in purpose (“omnibus reactor”). (7) Very little development is required. It will use mostly “off-the-shelf” components. (8) The reactor is in the study phase. It is not being built now.

“On the other hand, a practical reactor plant can be distinguished by the following characteristics: (1) It is being built now. (2) It is behind schedule. (3) It is requiring an immense amount of development on apparently trivial items. Corrosion, in particular, is a problem. (4) It is very expensive. (5) It takes a long time to build because of the engineering development problems. (6) It is large. (7) It is heavy. (8) It is complicated.

"The tools of the academic-reactor designer are a piece of paper and pencil with an eraser. It a mistake is made, it can always be erased and changed. If the practical-reactor designer errs, he wears the mistake around his neck; it cannot be erased. Everyone can see it.

“The academic-reactor designer is a dilettante. He has not had to assume any real responsibility in connection with his projects. He is free to luxuriate in elegant ideas, the practical shortcomings of which can be relegated to the category of “mere technical details.” The practical-reactor designer must live with these same technical details. Although recalcitrant and awkward, they must be solved and cannot be put off until tomorrow. Their solutions require manpower, time and money."

Tuesday, February 24, 2015

Using OA Extensions to extend existing Apps 11i OA Framework pages (step by step) (Doc ID 283158.1)

PURPOSE
-------
This document are some personal thoughts to describe the steps to add an Extension to an Apps 11i page using the OA Extensions released with 11.5.10.

It is not meant to be a commercial strength application, but simply an simple exercise to go through the steps to demonstrate some kind of addition to an existing Apps 11i OA Framework page.

 
SCOPE & APPLICATION
-------------------
Consultants or Customers who need a guided practise to extend an existing Apps 11i OAF page 


Using OA Extensions to extend existing Apps 11i OA Framework pages (step by step)
--------------------------------------------------------------------------------
Decided to do a simple customization to the "Customer Search" page in the "  iReceivables Internal, Vision Operations (USA)" responsibility .

Internal system is a 11.5.10 CU2 VISION installation, with Windows 2000 RDBMS and middle tier, and also load balanced Linux Middle tier (so I need to deploy Java code onto both middle tier servers)
 

STEP BY STEP
------------

Create customization in existing package
-----------------------------------------

1) Create new project
In my simple test, I am creating a new OA Project called "mzExtend"I am using application shortname "MZ" and responsibility key "MZCUSTOMSSWA" for my project, as this is already setup on my environment (see Note 216589.1)  

In project settings, change the Runner options in configuration section to add the entry "-Djbo.project=mzExtend" to the end of the line.
Also add "F:\oracle\viscomn\java" to the "Additional Classpath" (this is a shared network drive to my OA_JAVA directory)   You would have to copy the server.xml to your local PC first, if the Apps 11i instance was on a Unix box.

2) Add existing BC4J Objects to your project
Refer to chapter 9 on the Developers Guide "Extending OA Framework Applications"
The "server.xml" files are shipped with Apps 11i, so you add the server.xml file to your custom project in order to access the original BC4J objects.   You need access to the original objects in order to select them in the "extends" field when creating your new object.

Add the file "F:\oracle\viscomn\java\oracle\apps\ar\irec\common\server\server.xml" to the project.   This will create a BC4J Package in your custom project.

For my custom page, I need to create a custom VO and AM 
 oracle.apps.ar.irec.common.server.InternalCustomerSearchByCustomerIdVO
 oracle.apps.ar.irec.common.server.CustomerSearchAM

Create a new VO, extending the original
 oracle.apps.ar.irec.common.server.mzInternalCustomerSearchByCustomerIdVO
 Manually copy the SQL from the original VO, my customization requires me to remove the WHERE clause from the original SQL

Create a new AM, extending the original
 oracle.apps.ar.irec.common.server.mzCustomerSearchAM
 In the view objects selection, add "mzInternalCustomerSearchByCustomerIdVO" 

I am modifying these java files, to enable a default selection to show when the custom page is launched
 mzCustomerSearchAMImpl.java
 mzInternalCustomerSearchByCustomerIdVOImpl.java

3) Create a new OA Web page called "mzSearchPG.xml"
 Simple page, with 4 fields from "mzInternalCustomerSearchByCustomerIdVO"
 
Add a Page Controller "mzSearchPGCO.java" to send a hard coded customerID to the AM to show customer data on the page when the page is launched (I told you this was a simple example :-) )   See java code in Appendix A below.

Run this page through JDeveloper and check it displays the page, with some data on it..

4) Now I want to deploy this to my Apps 11i instance, so I can run through Apps itself

a) First copy over the compiled objects, if using your custom scheme, this could be easiest achieved by copying over the whole of the D:\Jdev_510\jdevhome\jdev\myclasses\oracle\apps\mz directory to the $OA_JAVA\oracle\apps\mz directory, although you can be more selective if required 
NOTE - it is the "myclasses" files you need to copy (the .class not the .java files!)
In this case, I have added classes to the existing ar directory structure, so need to copy the 4 class files from "D:\Jdev_510\jdevhome\jdev\myclasses\oracle\apps\ar\irec\common\server" to the $OA_JAVA/oracle\apps\ar\irec\common\server directory.

b) I have not yet used the "substitution" mechanism in JDev to use custom objects rather than the original ones, but had I done so, I would need to load the <Project Name>.jpx file into the MDS.   Follow the instructions in the Developers Guide, chapter 9 "Deploying Customer Extentions" to do this, but you can use a batch file like below:-
 REM
 REM  Batch file to set environment to upload JPX file into Apps database
 REM  Version : 1.0
 REM  Author  : Mike Shaw     
 REM  Updated : 16th Sept 2004
 REM 
 REM   This section is for the PC specific variables
 set JDEV_BIN_HOME=D:\Jdev_510\jdevbin
 set JDEV_USER_HOME=D:\Jdev_510\jdevhome\jdev
 set DB_CONNECTION="(DESCRIPTION=(ADDRESS=(PROTOCOL=tcp)(host=hostname.domain.com)(port=1521))(CONNECT_DATA=(SID=VIS)))"
 set JPX2UPLOAD=mzExtend
 set APPS_PASSWD=apps
 REM   End of PC specific variables
 REM  Set PATH to ensure we are using the right Java.exe
 set PATH=%JDEV_BIN_HOME%\jdk\bin;%JDEV_BIN_HOME%\jdev\bin;%PATH%
 REM This is what we actually want to run...
 call jpximport.bat %JDEV_USER_HOME%\myprojects\%JPX2UPLOAD%.jpx -username apps -password %APPS_PASSWD% -dbconnection %DB_CONNECTION%  
 pause
 REM   End of process

This loads the JPX into the MDS, for example to the location
 /oracle/apps/ar/irec/common/server/customizations/site/0/mzInternalCustomerSearchByCustomerIdVO

To remove the substitution, you would need to use JDR_UTILS, for example
 exec jdr_utils.deleteDocument('/oracle/apps/ar/irec/common/server/customizations/site/0/mzInternalCustomerSearchByCustomerIdVO');

c) Deploy the XML pages into MDS from local PC.  Can use following wrapper script
 REM
 REM  Batch file to set environment to upload XML Page files into Apps database
 REM  Version : 1.0
 REM  Author  : Mike Shaw     
 REM  Updated : 27th Jan 2005
 REM 
 REM   This section is for the PC specific variables
 set JDEV_BIN_HOME=D:\Jdev_510\jdevbin
 set JDEV_USER_HOME=D:\Jdev_510\jdevhome\jdev
 set JDEV_PROJECT_HOME=%JDEV_USER_HOME%\myprojects
 set DB_CONNECTION="(DESCRIPTION=(ADDRESS=(PROTOCOL=tcp)(host=hostname.domain.com)(port=1521))(CONNECT_DATA=(SID=VIS)))"
 REM example of PAGE2UPLOAD mz\comments\bc4jcomponents\CreateCommentPG
 REM         can also just specify directory to load all pages in that directory
 set PAGE2UPLOAD=ar\irec\common\server
 set APPS_PASSWD=apps
 REM   End of PC specific variables
 REM  Set PATH to ensure we are using the right Java.exe
 set PATH=%JDEV_BIN_HOME%\jdk\bin;%JDEV_BIN_HOME%\jdev\bin;%PATH%
 REM This is what we actually want to run...
 call import.bat %JDEV_PROJECT_HOME%\oracle\apps\%PAGE2UPLOAD% -rootdir %JDEV_PROJECT_HOME% -mmddir %JDEV_BIN_HOME%\jdev\lib\ext\jrad\config\mmd -username apps -password %APPS_PASSWD% -dbconnection %DB_CONNECTION%  -jdk13 -validate 
 pause
 REM   End of process   
 
Check they are uploaded OK, using the SQL 
 REM        START OF SQL
 set serveroutput on
 set pagesize 132
 exec JDR_UTILS.listContents('/oracle/apps/ar/irec/common/server', true);
 REM        END OF SQL


The following is a general script to look for all pages in your custom schema
 REM        START OF SQL
 set serveroutput on
 set pagesize 132
 exec JDR_UTILS.listContents('/oracle/apps/mz', true);
 REM        END OF SQL


d) Create new Function to call the page, for example:
 Function Name = MZ_CREATE_COMMENT
 User Function Name = mz Create Comment
 Type = SSWA JSP Function (JSP)
 HTML Call = OA.jsp?page=/oracle/apps/mz/comments/bc4jcomponents/CreateCommentPG

In my case, I am adding the following:
 Function Name = MZ_CUSTOMER_SEARCH
 User Function Name = mz Customer Search
 Type = SSWA JSP Function (JSP)
 HTML Call = OA.jsp?page=/oracle/apps/ar/irec/common/server/mzSearchPG

e) Add function to menu 
 MZ_CUSTOM_SSWA menu for example.

f) Bounce Apache
 
g) Test page
 Login as user with the responsibility to see the menu
 Select the menu function to launch the page and check the results are the same as from JDeveloper
 

Create similar customization, in custom schema
----------------------------------------------
I really should have created the above customization in my custom schema, so will do so now.


Create a new empty BC4J package called 
 oracle.apps.mz.sanity.server

For my custom page, I need to create a custom VO and AM 

Create a new VO, extending the original
 oracle.apps.mz.sanity.server.mzSearchVO
 Manually copy the SQL from the original VO, my customization requires me to remove the WHERE clause from the original SQL

Create a new AM, extending the original
 oracle.apps.mz.sanity.server.mzSearchAM
 In the view objects selection, add "mzSearchVO" 

I am modifying these java files, to enable a default selection to show when the custom page is launched
 mzSearchAMImpl.java
 mzSearchVOImpl.java

3) Create a new OA Web page called "mzNewSearchPG.xml"
 Simple page, with 4 fields from "mzSearchVO"
 
Add a Page Controller "mzNewSearchCO.java" to send a hard coded customerID to the AM to show customer data on the page when the page is launched.

Run this page through JDeveloper and check it displays the page, with some data on it..

4) Deploy the page and java objects to the Apps 11i instance and re-test

5) Once checked that it is working, I am now going to personalize this new screen.
I did not include all the items from the VO in the customization, so will add a new field to the page directly.

Do a Site level personalization, then add an item.

Type = Stylised Text
ID   = ConcatenatedAddress
prompt = Address
VO Attribute = ConcatenatedAddress
VO Instance = mzSearchVO1

On saving this personalization and returning to the page, you will see the Address text on the page as well


APPENDIX A
--
-- java code for mzSearchPGCO page controller
-- (comments and spacing stripped out)
--
package oracle.apps.ar.irec.common.server.webui;
import java.io.Serializable;
import oracle.apps.fnd.common.MessageToken;
import oracle.apps.fnd.common.VersionInfo;
import oracle.apps.fnd.framework.OAApplicationModule;
import oracle.apps.fnd.framework.OAException;
import oracle.apps.fnd.framework.OAViewObject;
import oracle.apps.fnd.framework.webui.OAControllerImpl;
import oracle.apps.fnd.framework.webui.OADialogPage;
import oracle.apps.fnd.framework.webui.OAPageContext;
import oracle.apps.fnd.framework.webui.OAWebBeanConstants;
import oracle.apps.fnd.framework.webui.beans.OAWebBean;
import oracle.jbo.domain.Number;
public class mzSearchPGCO extends OAControllerImpl
{
  public static final String RCS_ID="$Header$";
  public static final boolean RCS_ID_RECORDED =
        VersionInfo.recordClassVersion(RCS_ID, "%packagename%");
  public void processRequest(OAPageContext pageContext, OAWebBean webBean)
  {
    super.processRequest(pageContext, webBean);
-- NOTE this is hard coded value for quickness and simplicity. 
    String customerId = "8070";
    OAApplicationModule am = pageContext.getApplicationModule(webBean);
    Serializable[] params = { customerId };
    am.invokeMethod("initDetails", params);
  }
  public void processFormRequest(OAPageContext pageContext, OAWebBean webBean)
  {
    super.processFormRequest(pageContext, webBean);
  }
} // end of class


IMPORTANT NOTE
--------------
Ensure you are using the correct version of JDeveloper.  Review Note 416708.1 to confirm the correct patch number


RELATED DOCUMENTS
-----------------
Note 330236.1 "Configuring JDeveloper For Use With Oracle Applications 11i"
Note 357218.1 "Troubleshooting JDeveloper setup for Oracle Applications"
Note 416708.1 "How to found right version of JDeveloper for eBusiness Suite 11i and 12"

Tuesday, February 10, 2015

Custom Account Generation Process

Custom Account Generation Process


Hi,

I am going to explain you about the customization of Account Generation Processes/Account generator workflows in various modules in Oracle Applications.

For all modules the basic profile option to run account generator workflow is "Account Generator:Run in Debug Mode". So Set the profile "Account Generator:Run in Debug Mode" to "Yes"

Account Payables:

 Workflow Name: Project Supplier Invoice Account Generation Process
 Internal Name:     PAAPINVW

   If the new invoice is created in the AP module (Oracle Payables à Invoice à Entry à Invoices) with the Project details. OR Invoice has interfaced from the other module like i-expense with Project details, we should definitely customize the ‘Project Supplier Invoice Account Generation Process (PAAPINVW.wft)’ workflow to create account in distributions.

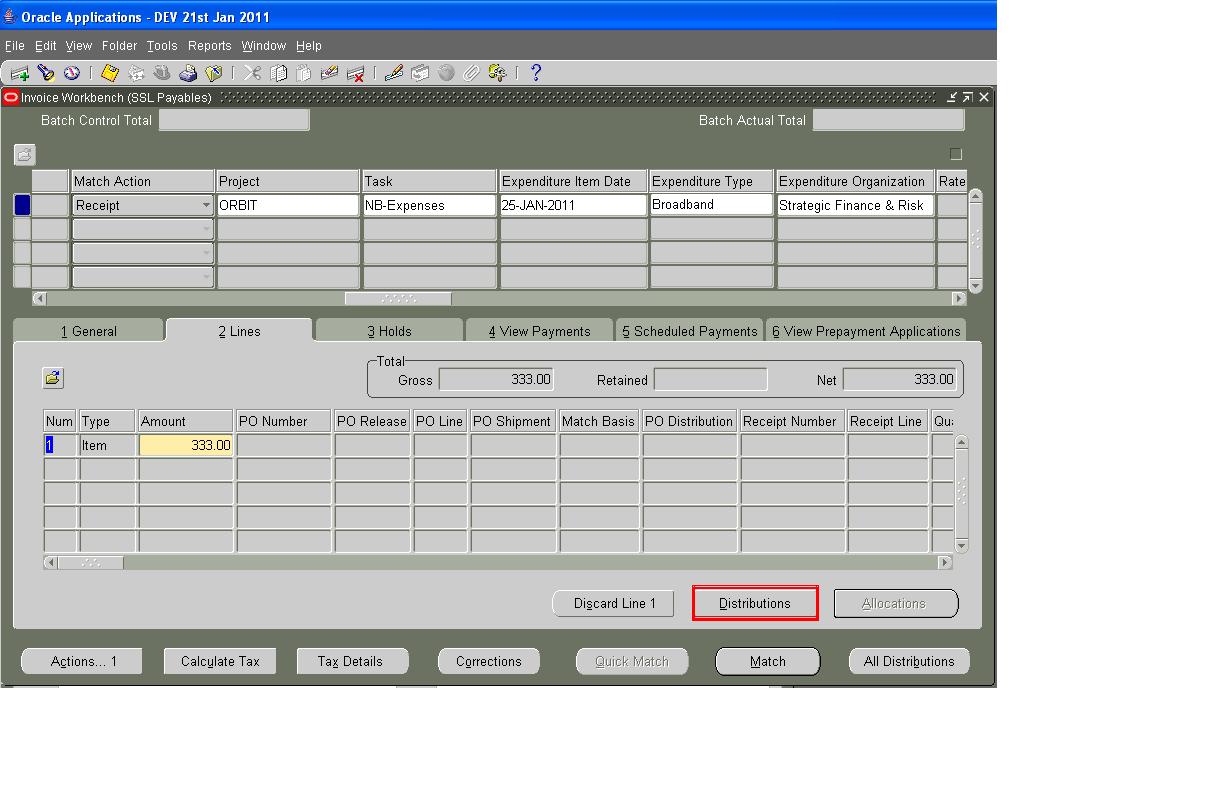
What will happen if the workflow is not customized?

       You will get the error saying “APP-SQLAP-97734: The system can not generate distribution lines…..”. Please find the screen shot of the error below.


Error comes whenever you click on distributions button.


Solution:

   Need to customize the workflow PAAPINVW, create a custom process where in remove all dummy default account generator functions and create/assign your accounting structure using custom functions OR we can use standard functions as well.

Find the below image for the Original Process “Generate default account (DEFAULT_ACCOUNT_GENERATION)”


Steps to customize the workflow:

  1. Copy the process and create another as it is
  2. Remove all Dummy default account generator functions
  3. Say if you have the accounting structure i.e code combination with 5 segments.
You need to assign values 5 times i.e you need to create 5 functions to assign each value.
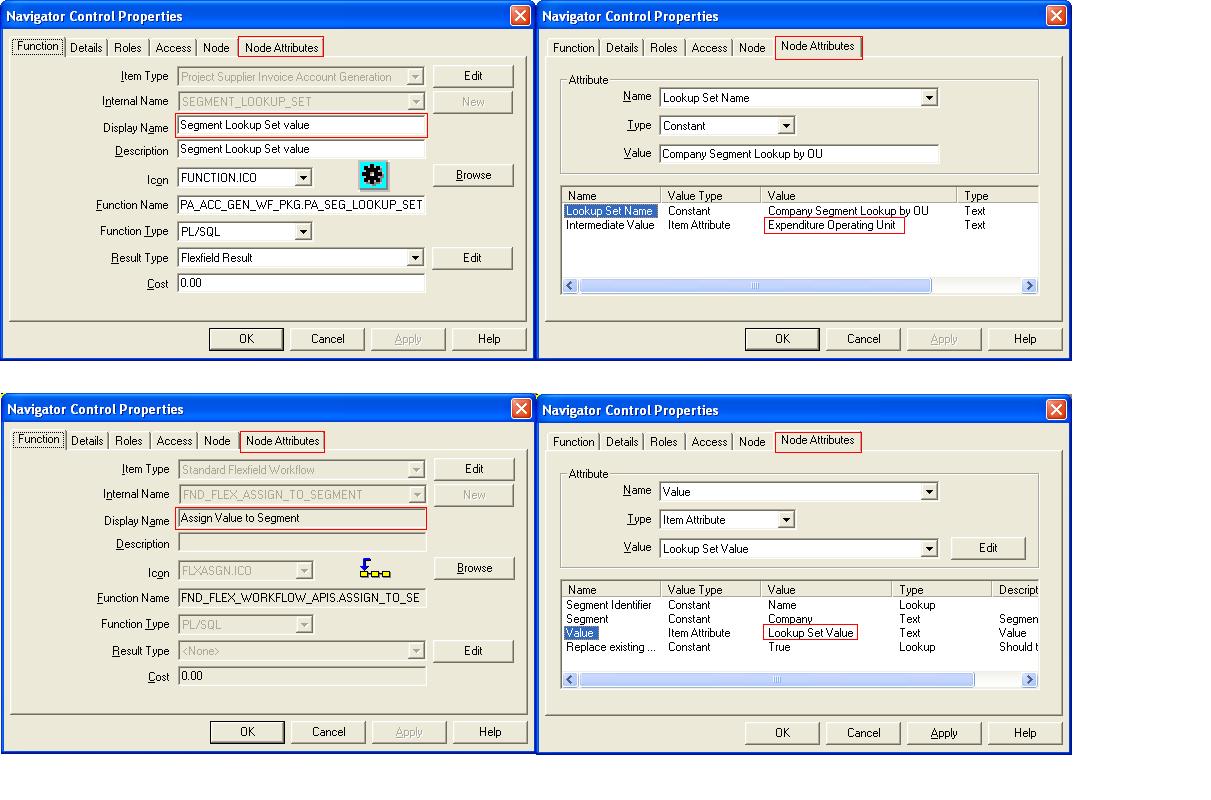
  1. You can directly assign each value using “Assign Value to Segment” function in the “Standard Flexfield Workflow (FNDFFWK)”. You usually get the Standard Flexfield Workflow () along with “Standard (WFSTD)” workflow whenever you open the PAAPINVW workflow.
  2. Assign values in Node attributes of the function “Assign Value to Segement”
  3. OR if you have a lookup to get the values of segments, then use the function “Segment Lookup Set value” to get the lookup values and then assign the value to segment. Use Node attributes here as well.
  4. Use the standard function “Validate Code Combination” after assigning all segment values
  5. Look at the screenshot below for the better understanding


How to set values in ‘Node Attributes’


  Double click on each function OR right click – Properties
  Click on Node attributes tab and assign the values. If you are going to get values from lookups get lookup name and the source (Expenditure Operating Unit) is the source in the screen shot. Use this lookup value while assigning the value. 

Where Expenditure Operating Unit is the standard item attribute, we can use values of standard item attributes to link in lookup value sets.

Node Attributes:


Lookup:


 *** You can create your custom activities depends upon the customization

After customizing the workflow assign the custom process in accounting flexfiled processes.

1.    Go to General ledger responsibility à Ctrl+L à Account Generation Processes à Find your custom accounting flexfiled structure
     Change the Process name to your custom process where the item type is ‘Project Supplier Invoice Account Generation’


2.  Set the profile option “PA: Allow Override of PA Distributions in AP/PO” to ‘No’.
     To override using the custom account generation process which we have created

Even after all customizations if you still gets the token error, please refer the following notes in Oracle Metalink for support.

R12: APXINWKB: APP-SQLAP-97734 Error Message Displayed At Invoice Distributions Generation Time: Distributions Cannot Be Generated For Line Because &TOKEN2 (Doc ID 850743.1)

Projects Supplier Invoice Account Generation Error: APP-SQLAP-97734: The System Cannot Generate Distributions (Doc ID 823787.1)

R12: APXINWKB: APP-SQLAP-97734 WHEN ENTERING INVOICE DISTRIBUTION (Doc ID 1360580.1)


i-Expenses:

 Workflow Name: Project Expense Report Account Generator
 Internal Name:     PAAPWEBX


Follow the same steps as above for customizing the workflow. Change the process in the accounting flexfiled structure in GL.

This workflow is going to fire/trigger whenever the user select the project while raising the expense in i-expenses module. After click on next the workflow triggers and creates the new/custom code combination before submitting the expense report.

Note: After submitting the expense report ‘Expenses (APEXP)’ workflow is going to trigger.

Project, Expenditure Orgainzation and task are going to enable in JSP page whenever we set theOIE profile options.

   Ex: OIE:Enable Project Allocations
         OIE:Enable Project Expenditure Organization

Note: A profile option OIE: Enable Project Allocations if set to "Yes with account allocations", then the Division and Cost center are enabled in Account Allocations tab of Expense Allocations Page of iExpenses. But with this if we update the Division this is not getting updated in the Expense report tables.

How to Build Accouting structure or Code combination id for Non-Project Expense Reports ? 

If the user is not selected the project while raising the expense report, this workflow will not launch/trigger.

Then how will the accounting structure/code combination creates in non project expense reports? With our triggering the accounting generator workflow?

   This is different concept altogether. In non project expense reports the accounting structure/code combination is going to build using the standard package (AP_WEB_CUS_ACCTG_PKG) with our customizations.

   This package has two main procedure for this customization. Those are
      ap_web_cus_acctg_pkg.getiscustombuildonly
          If this function returns 1, then your custom code in PL/SQL    ap_web_cus_acctg_pkgbuildaccount will be called.
    ap_web_cus_acctg_pkg.buildaccount
        This is where you actually build the default account for non-project expense line.


getiscustombuildonly API this must return 1 if you want your custom logic to kick-off.
If this API does not return 1, then iExpenses will use the person level default accounts from HRMS.

Sample code you can use is (from apps2fusion). You can find the real time code below.


  FUNCTION buildaccount(p_report_header_id      IN NUMBER
                       ,p_report_line_id        IN NUMBER
                       ,p_employee_id           IN NUMBER
                       ,p_cost_center           IN VARCHAR2
                       ,p_exp_type_parameter_id IN NUMBER
                       ,p_segments              IN ap_oie_kff_segments_t
                       ,p_ccid                  IN NUMBER
                       ,p_build_mode            IN VARCHAR2
                       ,p_new_segments          OUT NOCOPY ap_oie_kff_segments_t
                       ,p_new_ccid              OUT NOCOPY NUMBER
                       ,p_return_error_message  OUT NOCOPY VARCHAR2)
    RETURN BOOLEAN IS
    l_account_array fnd_flex_ext.segmentarray;
  BEGIN
    p_new_ccid := 240694; --do not hard code in realiy, this is just sample
    l_account_array(1) := 'FOCUST';
    l_account_array(2) := 'CONSULTANCY';
    l_account_array(3) := 'R12';
    l_account_array(4) := '165122';
    l_account_array(5) := '0';
    l_account_array(6) := '0';
    l_account_array(7) := '0';
    p_new_segments := ap_oie_kff_segments_t('');
    p_new_segments.EXTEND(l_account_array.COUNT);
    FOR n_ctr IN 1 .. l_account_array.COUNT LOOP
      p_new_segments(n_ctr) := l_account_array(n_ctr);
    END LOOP;
    RETURN TRUE;
  END buildaccount;


Real time code:

Copy from here and paste it in your text pads.

FUNCTION GetIsCustomBuildOnly RETURN NUMBER

IS

BEGIN


    -- if you want to enable custom builds

    return 1;


    -- if you do not want to enable custom builds

    --return 0;


END;


FUNCTION BuildAccount(

        p_report_header_id              IN NUMBER,

        p_report_line_id                IN NUMBER,

        p_employee_id                   IN NUMBER,

        p_cost_center                   IN VARCHAR2,

        p_exp_type_parameter_id         IN NUMBER,

        p_segments                      IN AP_OIE_KFF_SEGMENTS_T,

        p_ccid                          IN NUMBER,

        p_build_mode                    IN VARCHAR2,

        p_new_segments                  OUT NOCOPY AP_OIE_KFF_SEGMENTS_T,

        p_new_ccid                      OUT NOCOPY NUMBER,

        p_return_error_message          OUT NOCOPY VARCHAR2) RETURNBOOLEAN

IS


l_chart_of_accounts_id NUMBER := 0;

l_flex_segment_delimiter VARCHAR2(2) := '';

l_concatenated_segments   varchar2(2000);

l_exp_line_acct_segs_array    FND_FLEX_EXT.SEGMENTARRAY;

l_default_emp_segments        FND_FLEX_EXT.SEGMENTARRAY;

l_FlexConcactenated           AP_EXPENSE_REPORT_PARAMS.FLEX_CONCACTENATED%TYPE;

l_exp_type_template_array     FND_FLEX_EXT.SEGMENTARRAY;

l_num_segments                NUMBER:=NULL;

l_default_emp_ccid            AP_WEB_DB_EXPRPT_PKG.expHdr_employeeCCID;

l_segment4 VARCHAR2(25) := NULL;

lc_flex_conc VARCHAR2(1000) := NULL;

lc_seg VARCHAR2(25) := NULL;


l_segment1 VARCHAR2(25) := NULL;

l_company_segment VARCHAR2(25) := NULL;


BEGIN


  p_new_segments := AP_OIE_KFF_SEGMENTS_T('');

   p_new_segments.extend(7);


  -- Get Employee default CCID

  IF (NOT AP_WEB_DB_EXPRPT_PKG.GetDefaultEmpCCID(

         p_employee_id          => p_employee_id,

         p_default_emp_ccid     => l_default_emp_ccid)) THEN

      NULL;

  END IF;


  IF (l_default_emp_ccid is null) THEN

    FND_MESSAGE.Set_Name('SQLAP', 'AP_WEB_EXP_MISSING_EMP_CCID');

    RAISE AP_WEB_OA_MAINFLOW_PKG.G_EXC_ERROR;

  END IF;


  --Get Chart of Accounts Id

  IF (NOT AP_WEB_DB_EXPRPT_PKG.GetChartOfAccountsID(

         p_employee_id          => p_employee_id,

         p_chart_of_accounts_id => l_chart_of_accounts_id)) THEN

      NULL;

  END IF;


  --Get default employee segments

  IF (l_default_emp_ccid IS NOT NULL) THEN

    IF (NOT FND_FLEX_EXT.GET_SEGMENTS(

                                'SQLGL',

                                'GL#',

                                l_chart_of_accounts_id,

                                l_default_emp_ccid,

                                l_num_segments,

                                l_default_emp_segments)) THEN

     RAISE AP_WEB_OA_MAINFLOW_PKG.G_EXC_ERROR;

       NULL;

    END IF; /* GET_SEGMENTS */

  END IF;


  IF (l_chart_of_accounts_id is null) THEN

    FND_MESSAGE.Set_Name('SQLAP', 'OIE_MISS_CHART_OF_ACC_ID');

    RAISE AP_WEB_OA_MAINFLOW_PKG.G_EXC_ERROR;

  END IF;


  -- Get segment delimiter

  l_flex_segment_delimiter := FND_FLEX_EXT.GET_DELIMITER(

                                        'SQLGL',

                                        'GL#',

                                        l_chart_of_accounts_id);


  IF (l_flex_segment_delimiter IS NULL) THEN

    FND_MSG_PUB.Add;

    RAISE AP_WEB_OA_MAINFLOW_PKG.G_EXC_ERROR;

  END IF;


  -- New code starts here


    if (p_ccid is not null) then


      IF (NOT FND_FLEX_EXT.GET_SEGMENTS('SQLGL',

                                      'GL#',

                                      l_chart_of_accounts_id,

                                      p_ccid,

                                      l_num_segments,

                                      l_exp_line_acct_segs_array)) THEN

--        return;

              Null;

      END IF;

    elsif (p_segments is not null and p_segments.count > 0) then


       IF (l_num_segments IS NULL) THEN

         l_num_segments := p_segments.count;

       END IF;


      FOR i IN 1..l_num_segments LOOP

            l_exp_line_acct_segs_array(i) := p_segments(i);

      END LOOP;


  end if /* p_ccid is not null or p_segments is not null */;


  -----------------------------------------------------------------------------

   if (p_exp_type_parameter_id is not null) then


    IF (AP_WEB_DB_EXPRPT_PKG.GetFlexConcactenated(

               p_parameter_id => p_exp_type_parameter_id,

               p_FlexConcactenated => l_FlexConcactenated)) THEN


  lc_flex_conc := TO_CHAR(l_FlexConcactenated);


  -- Getting Account segment from the concactenated expense report template accounting structure

   SELECT SUBSTR(lc_flex_conc,(INSTR(lc_flex_conc,l_flex_segment_delimiter,1,3)+1),(instr(lc_flex_conc,l_flex_segment_delimiter,1,4))-((instr(lc_flex_conc,l_flex_segment_delimiter,1,3)+1)))

   INTO   lc_seg

   FROM   DUAL;


   SELECT SUBSTR(lc_flex_conc,1,(instr(lc_flex_conc,l_flex_segment_delimiter,1,1)-1))

   INTO   l_company_segment   FROM   DUAL;


 -- l_segment4 := SUBSTR(l_FlexConcactenated,(INSTR(l_FlexConcactenated,l_flex_segment_delimiter,1,3)+1),(instr(l_FlexConcactenated,'-',1,4))-((instr(l_FlexConcactenated,'-',1,3)+1)));

 -- INSERT INTO temp_rajesh VALUES ('l_segment4',l_segment4);

     /*  IF l_FlexConcactenated is not null THEN

          l_num_segments := FND_FLEX_EXT.Breakup_Segments(l_FlexConcactenated,                                                          l_flex_segment_delimiter,                                                          l_exp_type_template_array);

       END IF; */

         NULL;

    END IF;

  end if; /* p_exp_type_parameter_id is not null */

  -----------------------------------------------------------------------------

     -- Overlay the incoming segment values with the segment values

     -- defined in expense type template IF the incoming segment value

     -- is NULL.

     /*   FOR i IN 1..l_num_segments LOOP

          -- If the incoming segment is not null, then keep this value, do nothing.

          IF (p_segments IS NOT NULL AND

              p_segments.EXISTS(i) AND

              p_segments(i) IS NOT NULL) THEN

            NULL;

          ELSIF (l_exp_type_template_array is not null and

              l_exp_type_template_array.count > 0 and

              l_exp_type_template_array(i) IS NOT NULL) THEN

            l_exp_line_acct_segs_array(i) := l_exp_type_template_array(i);

          ELSE

                   INSERT INTO temp_rajesh VALUES ('ELSE-Check it',NULL);

          END IF; -- l_exp_type_template_array(i) IS NOT NULL

       END LOOP; -- 1..l_num_segments

*/

/* IMPORTANT NOTE:

   Below values are hard code, coz workflow is failing in validation when we capture the same from select statement

   This will work for all existing CTC elements

   For other CTC elements the account will default to 420011 (which is wrong)

   For new CTC elements add some more IF conditions like below */


  IF l_company_segment = 'SSL' THEN

      p_new_segments(1) := 'SSL';

  ELSIF  l_company_segment = 'SEL' THEN

    p_new_segments(1) := 'SEL';

  ELSIF  l_company_segment = 'SSLDubai' THEN

    p_new_segments(1) := 'SSLDubai';

  ELSIF  l_company_segment = 'TUI' THEN

    p_new_segments(1) := 'TUI';

  ELSIF  l_company_segment = 'SITL' THEN

    p_new_segments(1) := 'SITL';

  ELSIF  l_company_segment = 'SSLUS' THEN

    p_new_segments(1) := 'SSLUS';

  ELSIF  l_company_segment = 'SSLUK' THEN

    p_new_segments(1) := 'SSLUK';

  ELSIF  l_company_segment = 'SSGmbH' THEN

    p_new_segments(1) := 'SSGmbH';

  ELSIF  l_company_segment = 'ODSi' THEN

    p_new_segments(1) := 'ODSi';

  ELSIF  l_company_segment = 'SSLSING' THEN

    p_new_segments(1) := 'SSLSING';

  ELSE

    p_new_segments(1) := 'SSL'; -- If the company not exists then use default value as SSL

  END IF;


   --p_new_segments(1) := l_default_emp_segments(1); --'SSL'; --p_segments(1); --'SSL';

   p_new_segments(2) := l_default_emp_segments(2); --p_segments(2); --'000000';

   p_new_segments(3) := l_default_emp_segments(3);--'PGERP'; --p_segments(3); --'PGERP';


  IF lc_seg = '423002' THEN -- Medical  Allowance

     p_new_segments(4) := '423002';

  ELSIF lc_seg = '420016' THEN -- Education Allowance

     p_new_segments(4) := '420016';

  ELSIF lc_seg = '441007' THEN -- Fuel Allowance

     p_new_segments(4) := '441007';

  ELSIF lc_seg = '423001' THEN -- LTA Allowance

     p_new_segments(4) := '423001';

  ELSIF lc_seg = '441006' THEN -- Car Allowance

     p_new_segments(4) := '441006';

  ELSIF lc_seg = '420011' THEN

     p_new_segments(4) := '420011'; -- Local Deputation Allowance

  ELSE

      p_new_segments(4) := '423002';--NULL; -- Do not generate accounting combinate

  END IF;


   --p_new_segments(4) := l_segment4;--l_exp_line_acct_segs_array(4);--l_exp_type_template_array(4); --'423002'; --p_segments(4); --'

   p_new_segments(5) := l_default_emp_segments(5); --'000000'; --p_segments(5); --'000000';

   p_new_segments(6) := l_default_emp_segments(6); --'000'; --p_segments(6); --'000';

   p_new_segments(7) := l_default_emp_segments(7); --'000000'; --p_segments(7); --'000000';


  l_concatenated_segments :=   p_new_segments(1)||l_flex_segment_delimiter                             ||p_new_segments(2)||l_flex_segment_delimiter                                       ||p_new_segments(3)||l_flex_segment_delimiter                                       ||p_new_segments(4)||l_flex_segment_delimiter                           ||p_new_segments(5)||l_flex_segment_delimiter                           ||p_new_segments(6)||l_flex_segment_delimiter

                                           ||p_new_segments(7);


  IF (FND_FLEX_KEYVAL.validate_segs('CREATE_COMBINATION',

                                        'SQLGL',

                                        'GL#',

                                        l_chart_of_accounts_id,

                                        l_concatenated_segments)) THEN --'SSL-BG1-PGERP-423002-000000-000-000000')) THEN


        p_new_ccid := FND_FLEX_KEYVAL.combination_id;


      ELSE

        p_return_error_message := FND_FLEX_KEYVAL.error_message;

        FND_MESSAGE.set_encoded(FND_FLEX_KEYVAL.encoded_error_message);

        fnd_msg_pub.add();


      END IF;

  return TRUE;

  --return FALSE;


END BuildAccount;


Thanks,
Rajesh